
The complete guide
How To Choose And Fit Stainless Bird Spike Strips
The mess starts small and then it does not stop
A single pigeon on a window ledge is nothing. Two weeks later there are four, the sill is white, and the brickwork underneath has a stain that no amount of hosing will shift. That is how bird problems go. Birds are habit-driven, and once a spot is marked as safe, word spreads. The droppings are acidic enough to etch paint and soften mortar over time. They block gutters, which backs water up under tiles. On a balcony or a shopfront they are simply unpleasant to be near.
Most people start with the easy fixes. A plastic owl, a strip of foil, a string of CDs. These work for about a fortnight, because birds are smarter than we give them credit for and they learn fast that nothing bad actually happens. What works is taking away the thing the bird actually wants, which is a flat, stable place to stand. That is all a spike strip does.
How the strips do their job
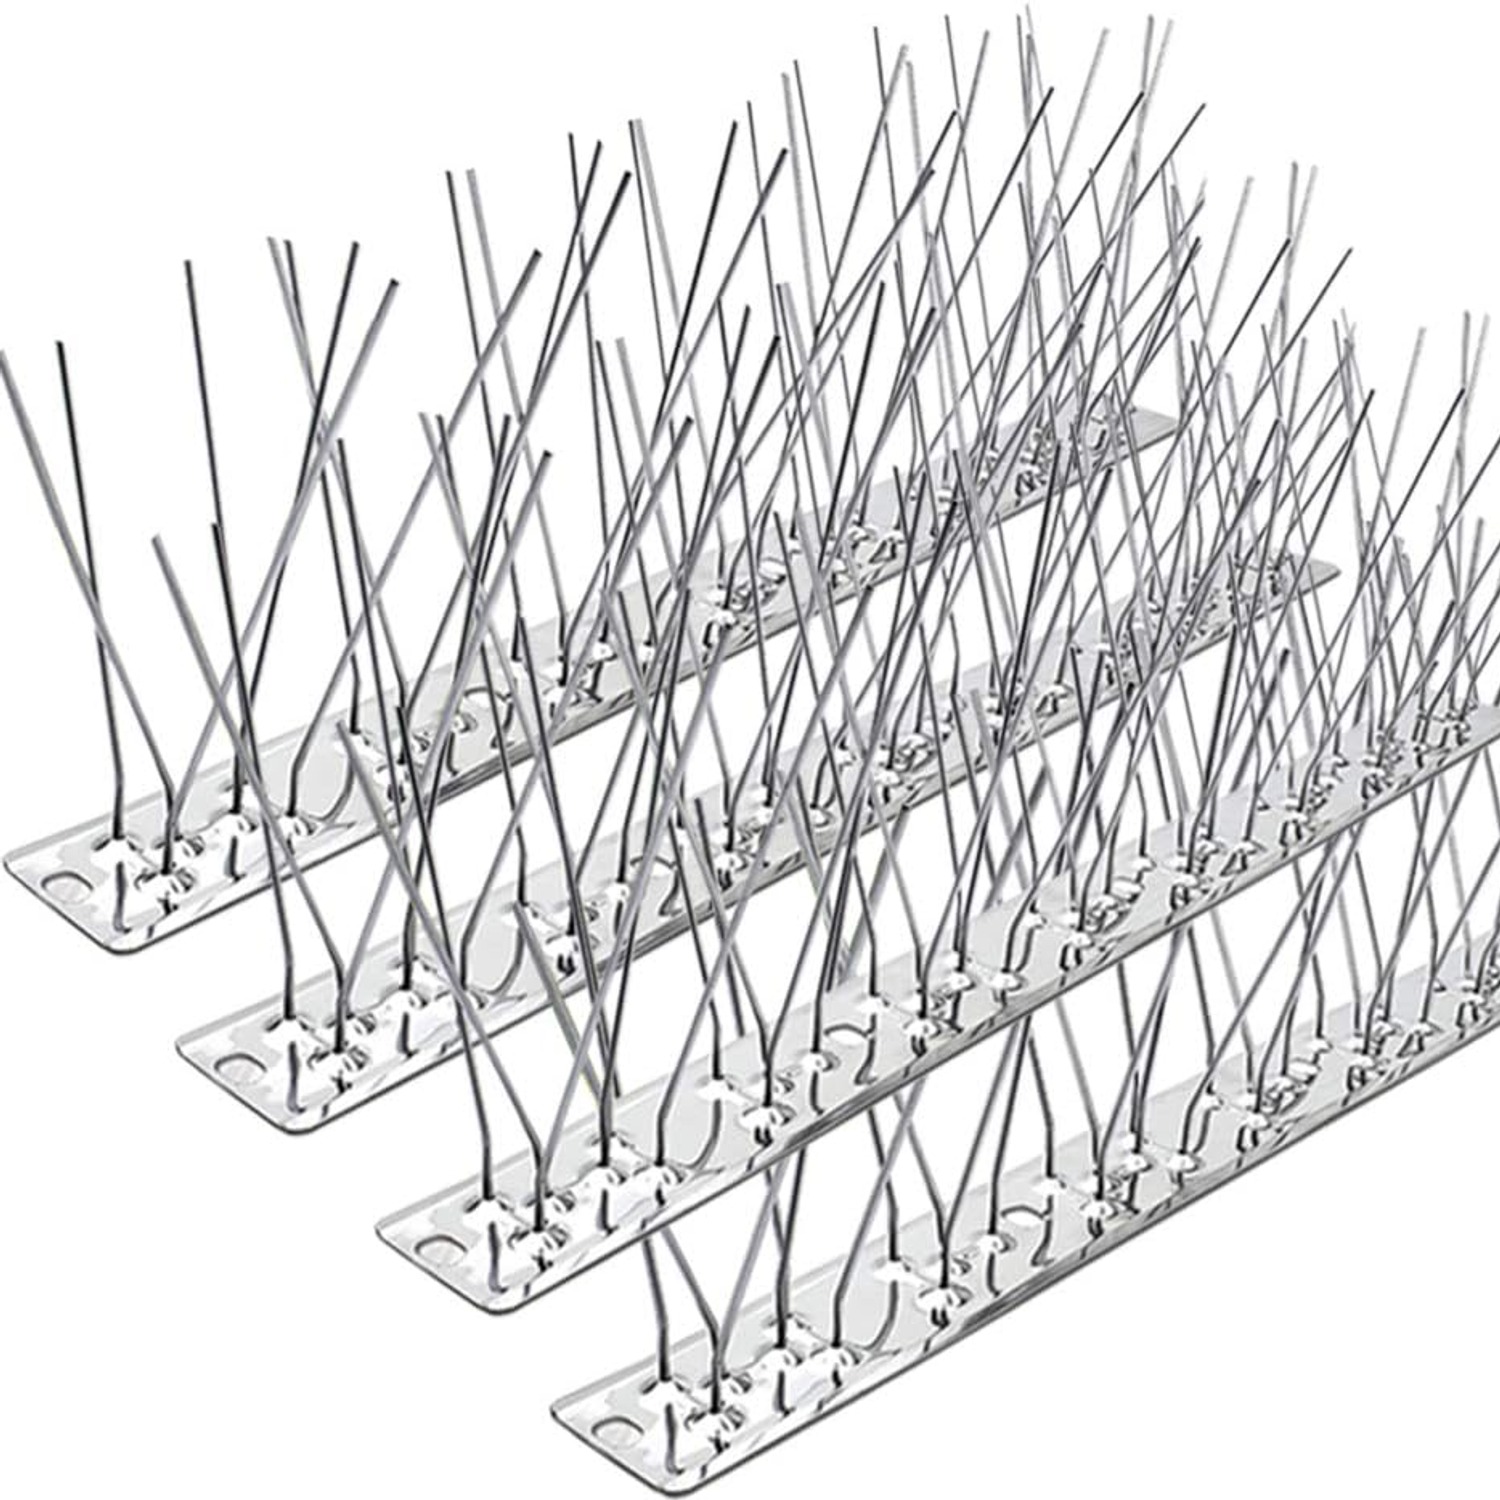
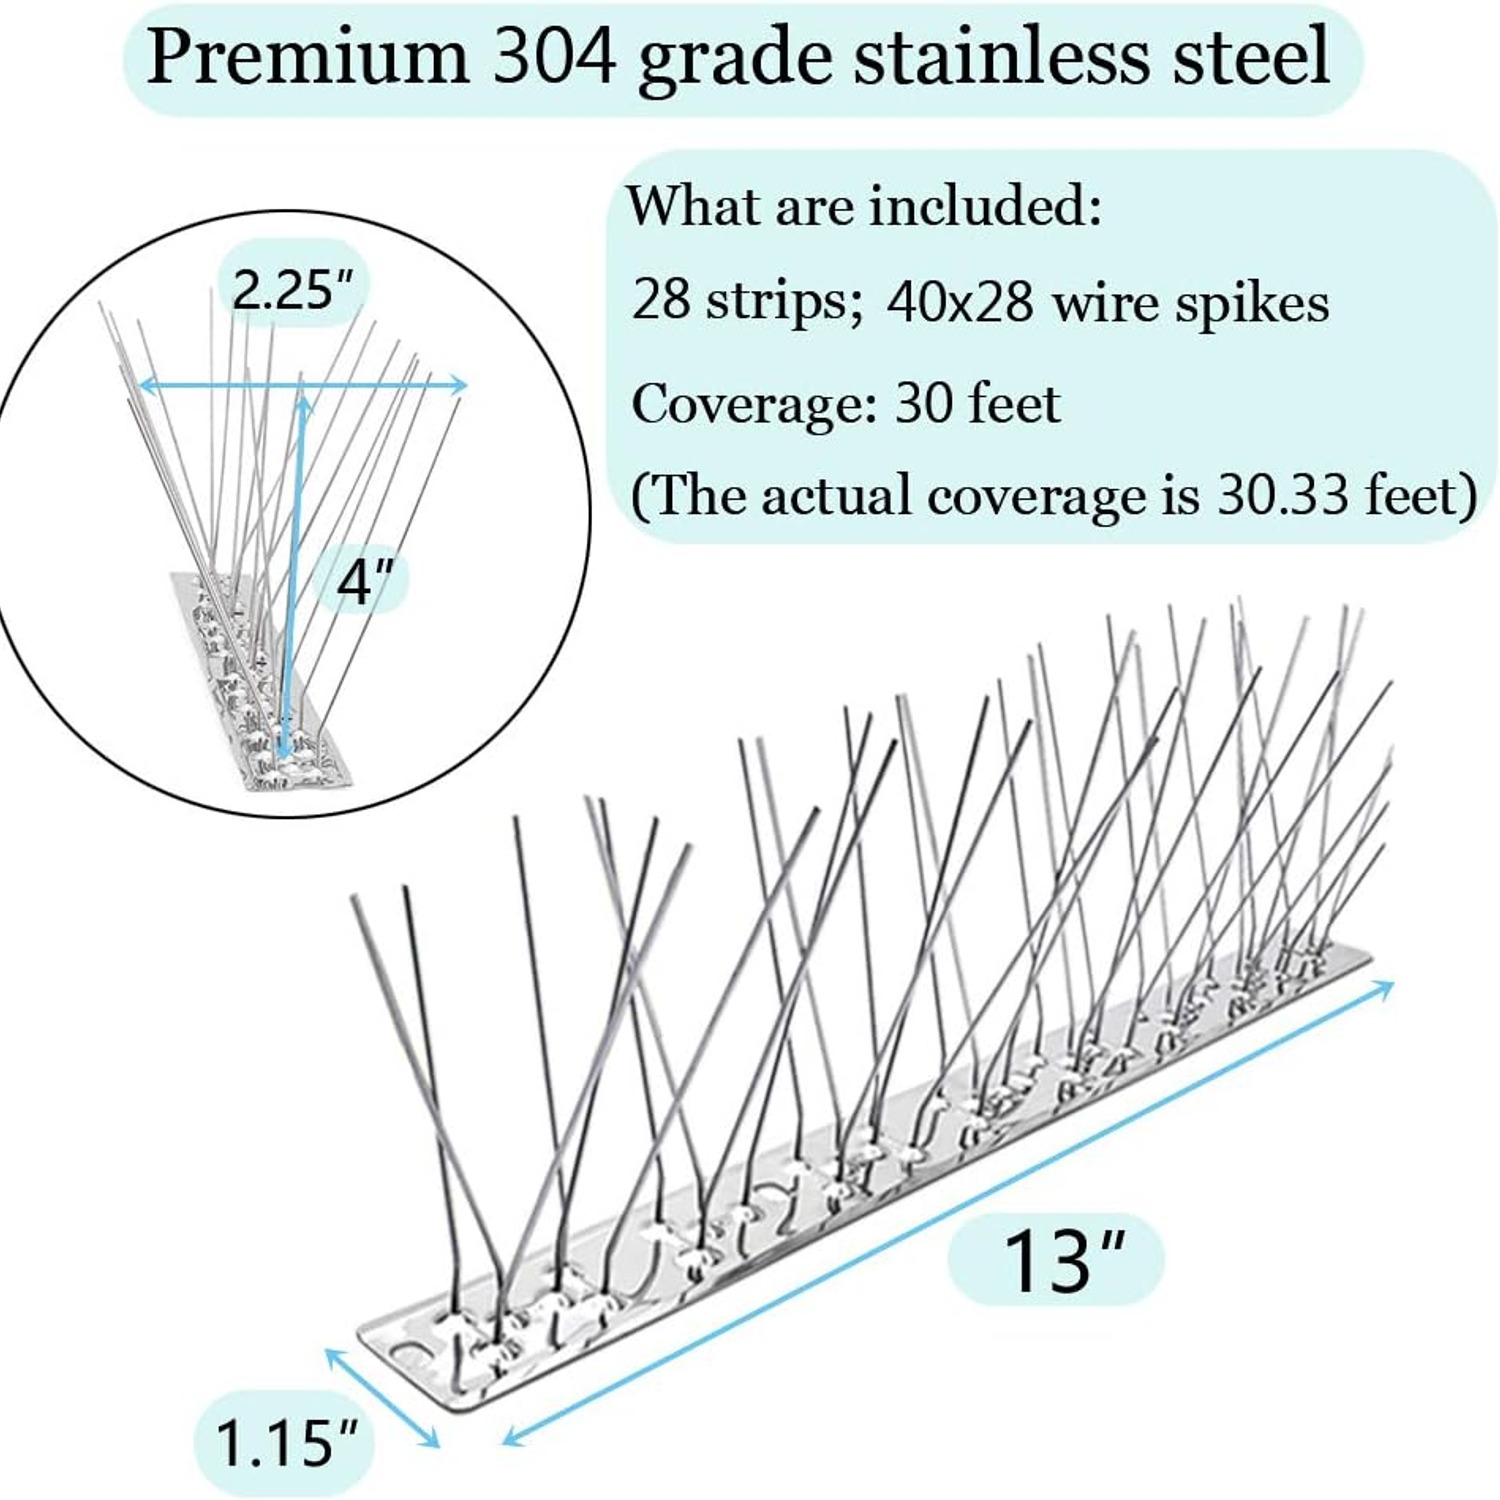
Each strip has a narrow stainless base with pins rising from it. The pins stand about 4 inches from the base to the tips and fan out to roughly 2.15 inches across at the top. That geometry is deliberate. The height stops larger birds from standing between pins, and the fan shape means there is no gap wide enough to settle in comfortably.
A bird comes in to land, sees no clear footing, adjusts, fails, and leaves. There is no shock, no noise, no chemical. After a few attempts, the ledge drops off the bird's mental map and it uses a different one. This is why spikes are the standard choice for the best humane bird deterrent on commercial buildings, where anything noisy or chemical would be a problem.
One thing to be clear about: spikes relocate birds, they do not remove them. If you spike a ledge and leave the one next to it bare, the birds move four feet to the left. Treat the whole problem area or expect to chase it around the building.
Why stainless steel is the part that matters
There are cheap spikes on the market with plated or galvanized steel pins and a plastic base. They look identical in a photo. The difference shows up in season two.
Plating wears through where the pin meets the base, water sits in that joint, and the pin starts to rust. Rust travels. It runs down the wall in brown streaks that are harder to clean than the droppings you installed the spikes to stop. On light render or painted timber the staining can be permanent. The pins also weaken at the base and start snapping off, which leaves gaps that birds find within days.
These strips use 304 grade stainless steel, which the supplier states will not rust or weaken when exposed to the weather and will not leave rust stains on your property. For anything you install at height and do not plan to revisit, that is the specification worth paying for. The cost difference is small. The cost of repainting a facade is not.
Who this kit suits
Thirty feet of strip is a sensible quantity for a domestic job. It covers a long run of guttering, the ledges along one side of a house, a full balcony rail, or a shopfront sign with some left over. If you are treating a whole terrace or a large commercial roofline, work out your total length first and order accordingly.
Common uses include window sills, parapet walls, chimney stacks, gutter edges, fascia boards, carport beams, shed roofs, boat canopies, air conditioning units, satellite dishes, light fittings and the frames around solar panels. The last one is worth highlighting. Birds love nesting in the warm gap under panels, and the nesting material is a genuine fire and efficiency risk. A strip along the frame edge is far cheaper than clearing a nest out later.
The strips are also useful on fence rails and pergola beams where birds queue up above outdoor seating. Anywhere a bird perches directly over something you care about is a candidate.
Measuring and planning the job
Get your tape out before you order. Measure the full length of every surface you want protected, including the returns around corners, then add about ten percent for offcuts and mistakes.
Then measure the depth of each ledge. This is where people get caught out. A strip has a base about 1.15 inches wide and the pins spread to around 2.15 inches at the top, so one row effectively guards a band a few inches wide. On a sill up to roughly 4 inches deep, one row along the outer edge is usually enough. On a parapet or ledge 8 inches deep or more, a single row just gives the birds a landing strip behind it. Run two rows, one near the front edge and one near the back, and your 30 feet of strip covers 15 feet of ledge.
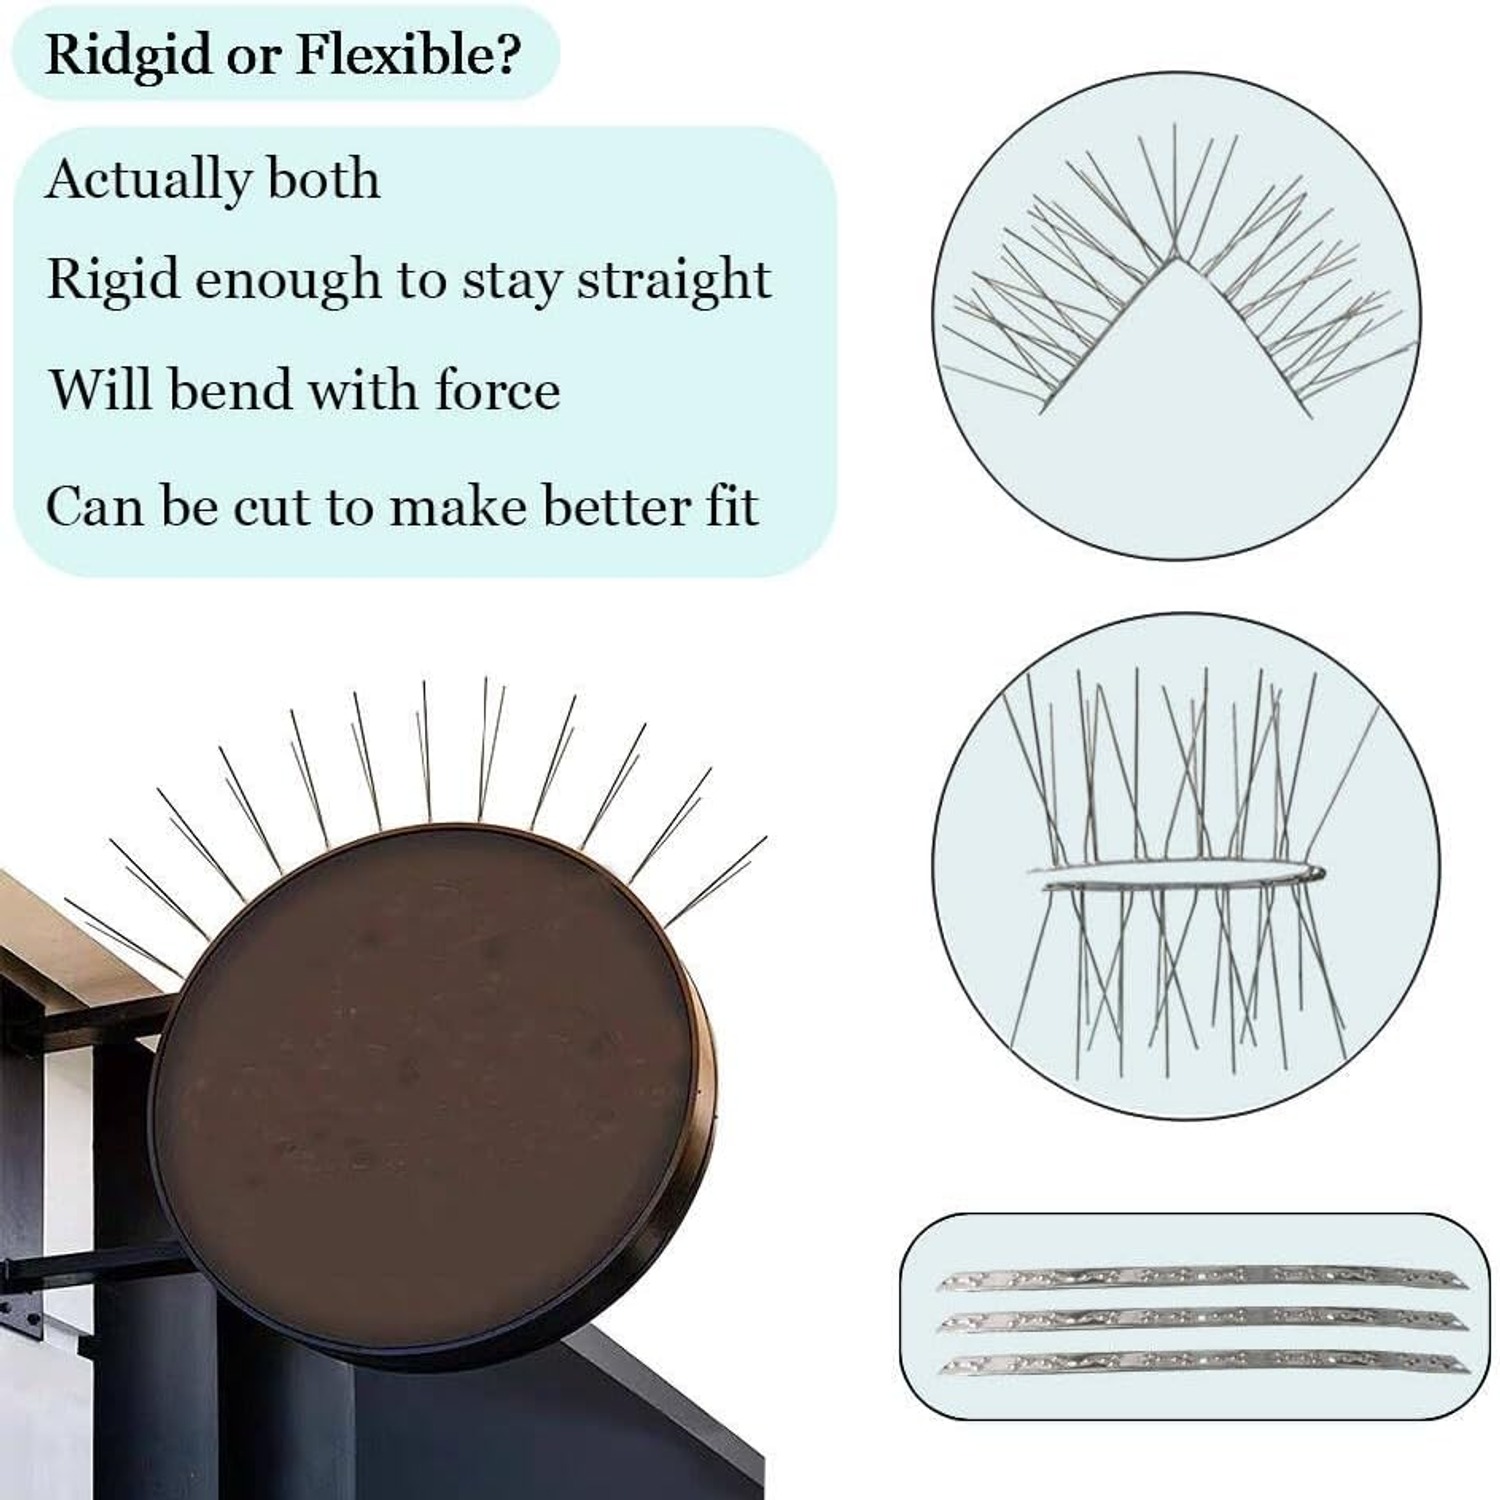
Also look for the gaps. Downpipe brackets, corners, the odd bracket or bolt head. Birds find these spots and use them. Because the base bends, you can shape a strip around an inside or outside corner rather than leaving it open, and you can cut a strip short with snips to fill an awkward 6 inch gap.
Fixing them down properly
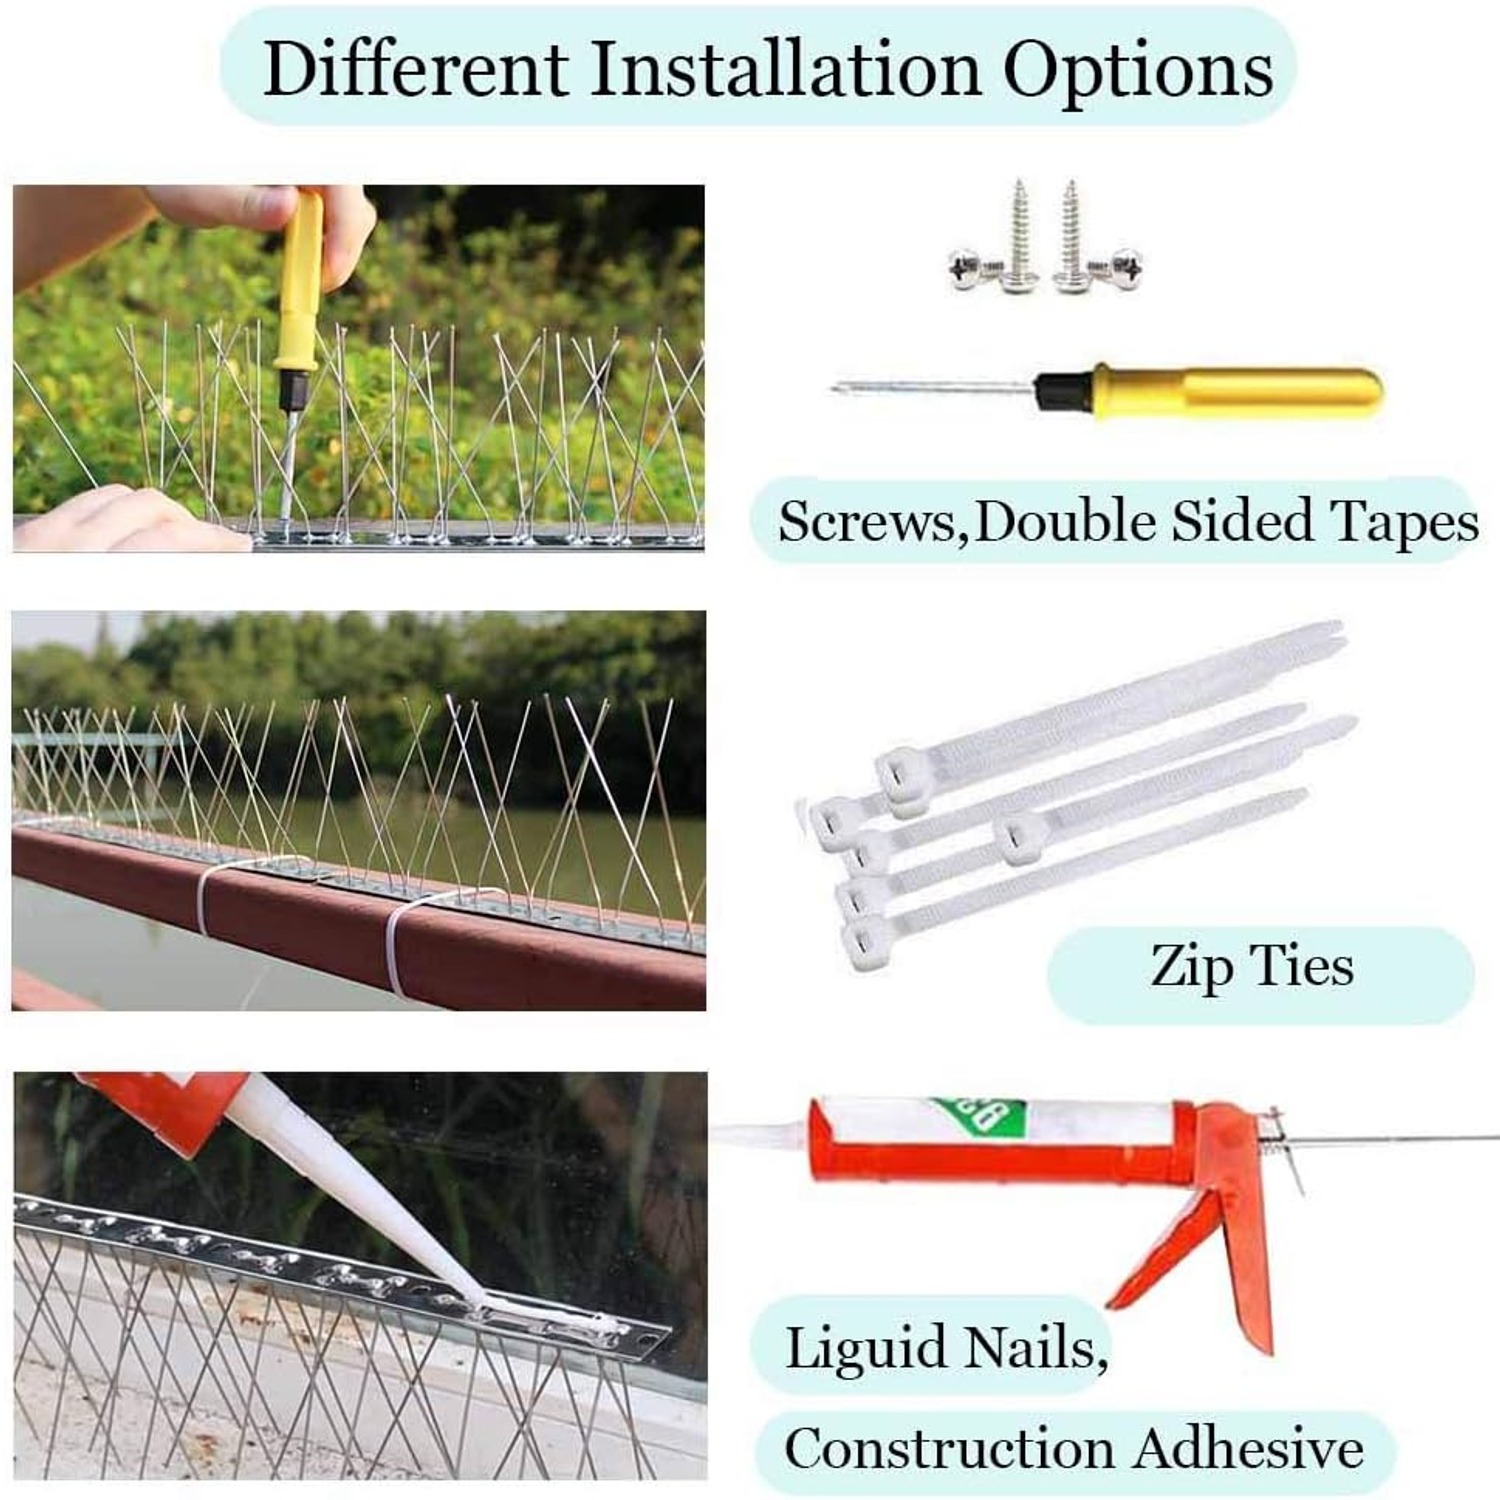
There are three mounting holes per strip, each about 0.315 by 0.216 inches, and four fixing methods worth knowing.
Zip ties are the fastest option on railings, pipes and anything you can wrap around. Buy UV-stable ties rather than the cheap indoor sort, because standard nylon goes brittle in strong sun and snaps after a summer or two. Pull them tight and trim the tails flush.
Screws give the most secure fix on timber fascia, posts and beams. Use stainless or coated screws so the fixing does not rust when the spike does not. On masonry, drill and plug first.
Construction adhesive suits surfaces you cannot drill, such as stone copings, glazed tile or rendered parapets. Run a continuous bead along the base rather than dots, press firmly and leave it to cure fully before you expect it to hold anything. Clean and dry the surface first, every time.
Double sided tape is the quickest no-drill option and works well on smooth painted metal, sealed timber and glass frames. It is less reliable on rough brick and in extreme heat.
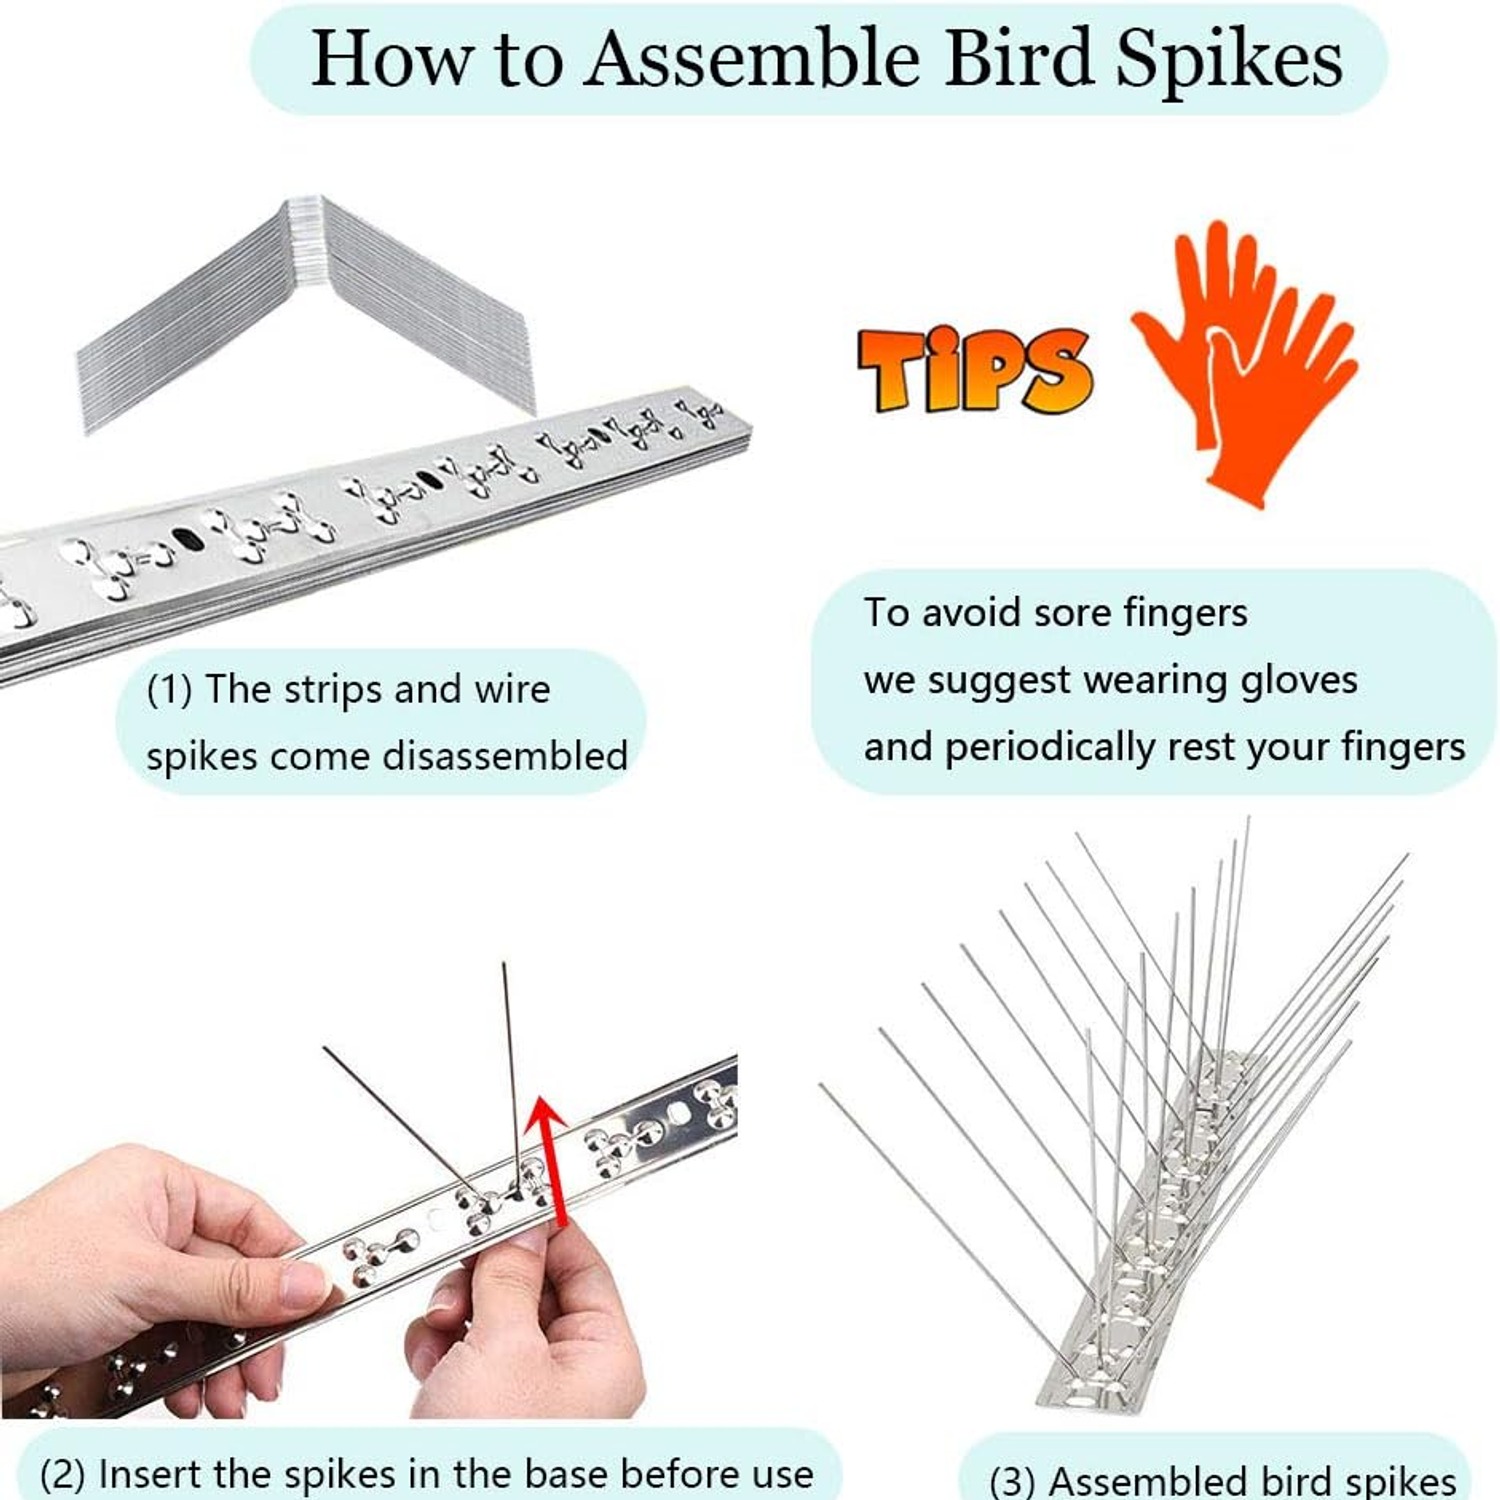
Whatever you pick, clean the surface first. Old droppings and nesting material prevent adhesion and carry the scent cues that draw birds back to a familiar spot. Wear gloves and a mask for that part, wet the material down before you scrape so dust does not go airborne, and bag it.
Keeping them working
Spikes are close to maintenance free, but they are not entirely hands-off. Twice a year, have a look along the line. Leaves, seed heads and windblown rubbish can collect between the pins, and once enough packs in, a bird will sit on top of it. A rinse with a hose and a brush between the pins clears it.
At the same time, check your fixings. Re-tighten screws that have worked loose, replace any zip tie that looks chalky or cracked, and press on glued sections to see whether anything has lifted. Avoid steel wool and harsh abrasives on the steel itself, as scratching the surface serves no purpose.
If you want them down for part of the year, zip-tied and taped strips lift off easily and can be stored flat. Dry them before you put them away.
The short version
Birds come back to flat surfaces. Take the flat surface away and they stop coming back. Stainless bird spike strips do that quietly, without harming anything, and from the ground you barely see them.
The specification that counts is the steel. 304 stainless costs a little more than plated alternatives and saves you a rust-streaked wall and a second install later. Measure your full run before ordering, double up your rows on deep ledges, treat every landing spot rather than most of them, and use the fixing method that suits the surface you are working on. Do that and one afternoon's work usually settles the problem for years.